This page collects the weekly blog posts written by students over the course of fieldwork during the Spring 2022 field season. These blog posts detail each of our weekly labs, including student summaries, reflections, photographs, data, and interpretations.
Posts appear in descending chronological order, with the most recent post appearing at the top of the page.
Spring 2022 Field Season
Week 10
Eli Offman and Emma Jahn
For this final archaeology lab we presented the fruits of our research to the greater Carleton and Northfield communities! We were split into two groups, the first stayed in the Anderson classroom, in order to present our artifacts, the ARCgis map of the Olin Farm site, and a collection of literature and artifacts contextualized by our visit to the Grand Meadow Chert Quarry in week 7. The second group headed out to the Olin Farm, to share details of our excavation and survey processes.
The Classroom

The classroom was set up to have a natural flow. As a visitor would enter, they would first be greeted with a map of the Arboretum, to introduce the concept. The visitor would then next be sent to a table containing information about the chert found at the quarry, informational pamphlets as well as a comic about NAGPRA, or the Native American Grave Protection and Repatriation Act, outlining the importance of doing Archaeology with clear intentions to honor the importance of what is found. Also displayed at this table were pieces of uncut chert from the site, as well as examples of flint-knapped chert arrowheads. Curated on tables around the room were a variety of artifacts, presented in groups focusing on such elements as glassware, ceramic fragments, and those specifically pointing to former student use of the site. Here, students gave presentations on their findings and independent research, interpreting previously-completed works such as the ceramic jar reconstructed during Week 9 and sharing the history of the Olin Farm. There was a final stop, outlining on ARCgis software the site: its boundaries, the outline of the features, the ground survey quarters, and dig sites. All of this was set up on an iPad to make it easily accessible, and intuitive to use and explore.
The Arboretum
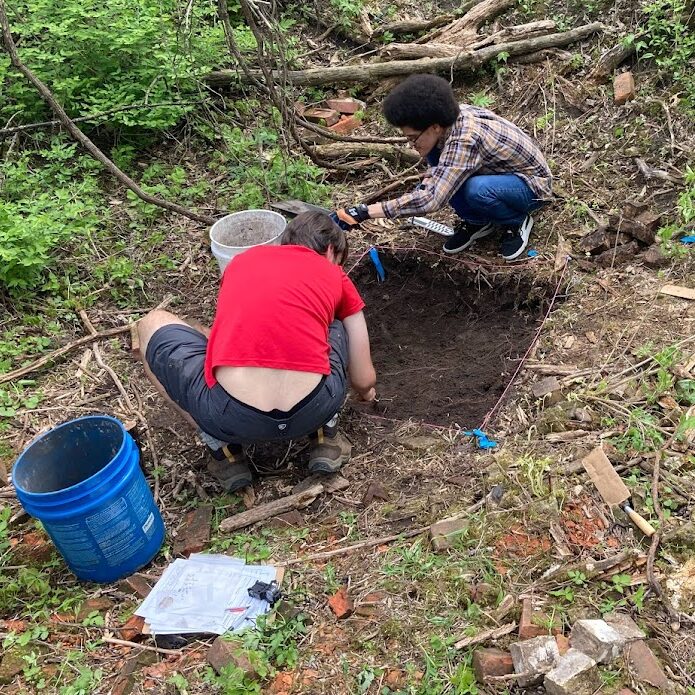
Out at Olin Farm, the team brought over some of the materials used to dig and survey the site, such as loves, buckets, the large sifter, some trowels, and a dustpan. We took the tarps off the dig sites close to the depression site, and placed some flags to mark the entrance to the trail. To direct visitors to the interpretive groups at the major features of the state, we stationed a person at the top of the path to act as a guide.
At the depression dig site, we talked mostly about the dig process: why we chose to dig this spot specifically, and why we believe that so much slag was present at the dig site. We also put on a few light demonstrations of the use of the sifter, in order to better display the techniques we used during our excavations. Interestingly, many of the questions directed at the depression feature were related to site maintenance, such as how the site was cleared of invasive species and explanations for the fire pits lined with brick as well. We also got a lot of questions about the amount of brick we were finding at the first dig site, which related back to the theory that there was some sort of on site metal working happening, explaining both the presence of the slag, as well as the bricks, which could have represented some sort of infrastructure for it.
Final Thoughts
Inviting the community into both the space of the classroom and of the farm site itself seems a fitting conclusion for the work which has been completed throughout the term. Now that we as students have finished our introduction to archaeology via our studies at the Olin Farm, sharing the information that we had gathered, the skills that we had learned, and the new narratives we had been able to piece together about the farm and its history with the community at large was the final step in completing the course’s journey. However, in going forward, we will continue to discuss, interpret, and share our findings, as one of the most valuable elements of the course as a whole has been to further our connection with the Carleton campus, both present and past.
Week 9
Amelie Cook and Ren Manuel
Our lab this week was focused on curation and publication. During the first part of the lab, the class was split into four groups: one group washed the remaining artifacts from Olin Farm and three groups worked on entering the artifacts into the database. The groups working on the database also checked to make sure that all the artifacts already in the database were correctly logged. We sorted the bags of artifacts based on material type (e.g. metal, ceramic, plastic, glass), Excavation Unit/Test Unit, and Level. We sorted through a few artifacts that we will be able to use as diagnostics for dating artifacts in future analysis (such as coins, bottle caps, and jacks) and rebagged them for further investigation later.


During the second part of the lab, the class split into five different groups: ArcGIS Clinic, Slag Analysis, Faunal Analysis, Metal Analysis, and Ceramics Analysis. The ArcGIS Clinic group worked on our maps of the Olin Farm site and started adding points on the map to label where we found different artifacts during our survey and excavation of the site. They created a heat map so that we can see which survey unit had a certain concentration of artifacts. The Slag Analysis group went to the geology lab to investigate the slag that we found at Olin Farm with a scanning electron microscope. In the slag, they identified lots of silicon, oxygen, aluminum, and a little bit of copper. The Faunal Analysis, Metal Analysis, and Ceramics Analysis groups each focused on analyzing the artifacts we found of each material type.
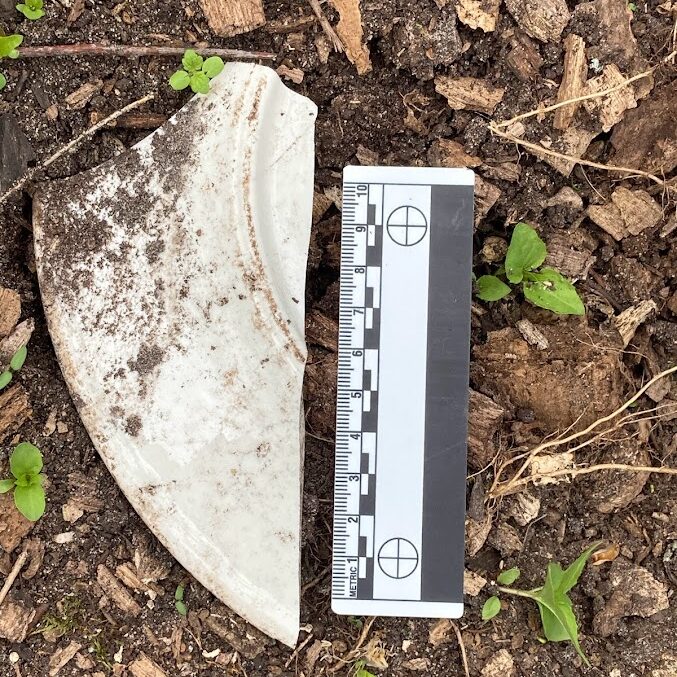
The Ceramics Analysis group mainly worked to catalog individual artifacts in the class artifact database; in doing so, they discovered a number of curious findings. They found multiple fragments of the same plate that had been scattered throughout one of the excavation sites at the Olin Farm site. The plate was white with green line-work designs over the surface. The designs formed a leafy pattern around the plate’s border, and also included a scene of a farm with a house, scarecrow, and trees in the center. The team is currently working to find what the plate may have originally looked like by searching through online resources. Finding an original version of the plate may also reveal the date the plate was created which could indicate the time period of our excavation site in the Olin Farm.

The second interesting finding from the Ceramics Group was several random fragments that they realized were from a singular ceramic pot. Because the shards of ceramic were so small and non-descript, the team began piecing together the pot with clay to ensure that they all came from the same artifact. In doing so, they were able to create an almost completely intact pot. Though they have not been able to find an original version of the pot online, they think it may have been an old make-up vessel.


Curating and analyzing all the artifacts we find is necessary to our understanding of the Olin Farm and the role it has played in Carleton’s history. It is clear that much of this area was used for waste disposal in the past. Although it is disappointing that people decided to leave their trash behind in the Arb, and threaten the natural landscape, the number of artifacts that we have found in this area gives us the opportunity to learn a lot about the history of the Olin Farm site. As we continue to analyze these artifacts, it is important to note which can be used as diagnostic tools, to identify date ranges for each level of an excavation unit.
Week 8
Sam Johnson-Lacoss and Kyra Landry
For this week’s lab period, the class split up into two groups—one responsible for continuing and completing the excavation and the other working to clean, record, and curate data from previous labs.
Excavation
The excavation portion of the lab consisted of further excavating test sites one, two, and three. Test unit one is located at the base of feature 1, an unnatural depression carved into the side of the slope surrounding a campfire. There, we found an abundance of various pieces of metal scraps, bricks, and shards of glass. The method that we used for excavation consisted of shoveling dirt and artifacts into a designated container, and then sifting the dirt through a sieve and collecting any artifacts found. We then labeled and bagged the artifacts and brought them back to the lab so that they could be curated.
We were unable to excavate test units four through six, as rain had washed new dirt and materials onto our units, which could have possibly contaminated them and made it impossible to use the data and artifacts in our research. Because of this, we decided to focus our excavation efforts on the uncontaminated Test Units 1-3.

From here, the excavation team divided further into the aforementioned excavation team and the mapping team, which worked heavily with the Trimble to record supplementary data for both this class’s final projects and Professor Kennedy’s fall 2022 course. In the name of data redundancy, the Trimble team collected regathered information of the outlines of both feature 1 and feature 2 (the concrete foundation adjacent to which test units four through six were established), along with miscellaneous artifacts of interest such as an old ceramic insulator, a shard of a broken plate, and piles of rusted metal. After collecting this data, the team was sent to remove the flags set down earlier in the term and to mark down any notable features.

13 centimeters long
Cleaning and Curation
This portion of the lab consisted of cleaning the artifacts collected from Olin Farm, such as various pieces of metal, slag, plastic, ceramic, and animal bone. These artifacts were then recorded into the class artifact database. In order to be able to use our data for research, we recorded which Test Unit the artifact was collected from, its material type, within which context it was collected, and any noticeable observations about the artifact that could be useful within our research.

Week 7
Jake Oberg, Collin Kelso
During this week’s lab, our class went to the Grand Meadow Chert Quarry, in Grand Meadow, Minnesota, to tour a Native American quarry that was in use until quite recently, and talk with two members of the Prairie Island Indian Community, Franky Jackson and Noah White, along with the archaeologists running the site. We also helped with the initial clearing of invasive Buckthorn and the re-mulching of trails.
The site was marked by hand-dug quarries, which appeared as roughly 5-to 6-foot-deep depressions in the ground, all searching for chert nodules used to make stone tools. The uses of these tools were ubiquitous; edge scrapers, for example, were used to strip tissue off of hide and smaller pieces of chert could be used to make knives or other similar objects. However, this site also holds a rich cultural heritage; according to archaeologists Tom Trow and Dan Wendt, this site has been in use for over 8,000 years by Native Americans due to the presence of extremely high-quality Grand Meadow Chert.


Chert, in general, is made up of silica (the same material as glass), and forms in marine environments; it is cryptocrystalline, meaning its crystals cannot be seen with the naked eye, and as such, it fractures in a way conducive to making tools. However, Grand Meadow Chert is unique geologically. According to Trow and Wendt, it is not only of extreme quality, with “an extremely sharp cutting edge, and a combination of hardness and toughness which would increase the durability of a sharp edge” (Trow and Wendt 2020, 80), but also lies in a single distinct layer. Trow, near the end of the day, showed us several examples of this chert, in both tool and non-tool forms; he also placed much confidence in the material, as he reportedly used a chert knife to cut boxes open.

The day started with a tour of the site, led by Trow, Jackson, and White; they showed us various pits, but more importantly, also showed us some areas of cultural significance to the Prairie Island Indian Community. We were also shown “anvil stones” – large rocks, often glacial erratics, used as a surface to break down the chert into workable tools. These had both a distinct weathering pattern and a distinct shape, enabling Trow to pick them out from other rocks. We were also shown middens (archaeological trash piles), which had not been excavated yet; Trow explained that these potentially held various human-made classes of artifacts (pottery is one example), and as such, provided potential for future research.
During and after the tour, Franky Jackson and Noah White, told students about both Native American history and their current involvement with the project. They talked about how the project is one of the first archeological projects that has directly involved local native communities (in this case the Prairie Island Indian Community), how they have been involved in the project, and how it will be used to help future generations connect with their ancestors by visiting the site and learning about their past. A specific section of the site is being reserved for exclusively tribal member use. One prominent way that this will happen is by having informational plaques in both English and Dakota. Beyond that, they also talked to students about how local tribes are able to repatriate both their ancestors and cultural artifacts, both burial goods and goods that were stolen in the 1800s.

There was so much buckthorn that the plants obscured the pits; the students were employed to rectify this. Students were split into three groups, with two removing invasive buckthorn from the quarry pits in order to make the pits more visible, get rid of the invasive species, and turn the buckthorn into mulch. They did this by grabbing either pre-cut buckthorn that was on/near the quarry pits, or buckthorn that was still in the ground and moving it away into various piles, depending on the size of the buckthorn. For example, if the buckthorn got to the size of a log (requiring it to be cut on both ends), it would go into its own pile, where anything smaller would go into a pile that would be mulched later. The two groups covered roughly three or four of the quarry pits and fully cleared at least one of the quarry pits of buckthorn. The third group took existing mulch from around the site on wheelbarrows and spread it onto newly-built trails; to pick up the mulch, they either used pitchforks or their hands. All three groups made decent headway.

Week 6
Ashok Khare, Alejandro González A.
The objectives of week six’s lab were to continue the excavation of the test units at the Olin farm site, and to begin the process of curating artifacts collected during last week’s lab. This lab also gave excavation opportunities to students who were not able to last week because of the lack of equipment.
At the beginning of the lab, we split up into two groups. Group 1, made up of students who did not get as much time (if any) to excavate in last week’s lab, went with Sarah, Sam, and MJ to continue working at the site. There, the group was further subdivided into two sections. The first section excavated one of the units by the depression feature, while the other focused on excavating the units around the housing feature.

Because of the recent rain, and bad archaeological practices, the soil on top of the excavation units hid humid soil right beneath it. This proposed a little bit of a challenge to the people excavating as it was unclear if the soil presented another context, or if it was simply the result of the recent weather conditions. Sarah explained that usually archaeologists will cover the excavation units to avoid this exact problem, and then suggested that it was safe to assume that no new context had been found. So excavation continued as normal and we stayed on context #2.
Once the first bucket was full of the excavated dirt, Emmett began the screening and sorting process with Sam’s help. The excavation group by the depression feature did not have much luck with their findings, only finding a bottle cap and a nail buried in the dirt. On the other hand, the group by the housing feature got lucky and found a lot of different artifacts, including a little chain and some bricks, as well as multiple ecofacts, mainly bones.
Meanwhile, group 2 stayed behind in the lab with Bee to begin the artifact curation process. Each group member took a bag of artifacts collected from last week’s excavation and tried to remove the dirt on them, using toothbrushes as well as wet paper towels for more sturdy artifacts. Specifically, group 2 focused on curating metal, glass, ceramic, and plastic artifacts, along with a portion of slag.


Once the cleaning was complete and we could see the smaller details on the artifacts, we organized them into lots, the details of which we recorded on a spreadsheet for organizational purposes. Artifacts were organized into lots depending on their characteristics and what information they could provide. For example, fragments of blue plastic were placed in a different lot than the remains of a blue plastic bottle, since the stem of the bottle could provide insight into the manufacturer and time of manufacturing. For each lot, we recorded the site and unit in which the artifacts were found, the number of artifacts in the lot, the material type of the artifacts, the date, and specific descriptions characterizing the artifacts contained in the lot.


After two hours of work, the groups switched places. Group 1 went back to the lab to curate more artifacts, while group 2 went out to the site to continue excavation. On site, group 2 split into teams. While one team worked on the excavation unit in the corner of the depression feature, the other team worked on the two excavation units on the slope of the depression. At various intervals, a pair or trio of students were also sent to use the Trimble to continue mapping the site boundaries.
The results of excavation varied significantly between the units. The team excavating the units on the slope continued to find high concentrations of artifacts, including slag, glass, ceramics, and metal objects. The team excavating the corner of the depression had less luck – the majority of the finds were bricks, though we did find a piece of barbed wire and metal fencing. Aside from artifacts found directly during excavation, Sam and MJ ran the sieving station to separate out the smaller artifacts hidden in the soil. From what we found, we were mostly concerned with collecting metal, ceramics, and glass. Because we had already collected a significant amount of slag, stone, and brick, we generally left those artifacts behind unless they were really exceptional.
By the end of the lab, the team excavating the corner unit of the depression reached the bottom of Level One – ten centimeters down – and started to excavate the next level until Sarah told us that we had done sufficient work on the unit and could clean it up for final evaluation. We smoothed out the sides of the unit to better see the stratigraphy, recorded the final depths of the center and corners of the unit, and sketched an image of the unit on an excavation form. Then, we placed tarps over the excavation units to prevent rain from getting in, packed up the equipment, and returned to the lab.

While group 2 was outside doing excavation, group 1 was in the lab working on curating their recently acquired artifacts. Each person grabbed a bag of artifacts, a bucket, a toothbrush, and we shared trays (since there were not enough for each of us to grab one) to lay out the perfectly curated artifacts before returning them to the bag. Each person worked on brushing off the dirt off their artifacts, although it was easier for some people than it was for others. For instance, big metal artifacts were easy to clean, as it was possible to submerge them directly into the water and brush them; however, it was not as simple for the people with tiny bones, which can’t be in contact with water, and have tiny pockets full of dirt that must be cleaned. Hence, collaboration was essential for effectiveness in this process as people with easier jobs began to help those who had tougher artifacts to curate. Overall, it was a productive process, and people could appreciate the artifacts more once they were cleaned.
Week 5
Evan Orjala and Hannah Scooler
In week five’s lab, Archaeology 246 students began surveying the survey grids created in week four at the Olin Farm site, started excavating some small test units, and also worked on plotting points in the site on the Trimble.
Once we arrived at the site, we began by splitting the class into two groups. The first group, consisting of the majority of the class, further split into trios to survey their allocated grids. A second, smaller group was trained by TA Sam Wege in utilizing the trimble to coordinate site boundaries, which we will use to map the site later. Twenty 5m by 5m grids were surveyed in total, with each team marking their finds with orange flags and then recording them on survey sheets after. Each survey sheet was specific to each survey grid, and included spaces to record artifact location and type. This process of surveying involved recording only what was visible on the surface in the areas being studied. We did not collect any artifacts, instead leaving them in their original context with the exception of brief photo opportunities.


Once all of the grids had been surveyed, we began choosing spots to excavate. We mainly focused on the depression, labeled Feature 1, examined in week four, since we wanted to learn more about its purpose and how it had been sculpted. We also focused our excavation plans on areas around the depression that showed a high density of artifacts and slag –– a byproduct of metal production –– on the surface. We created squares of 1 meter by 1 meter on the depression, and split into groups of three or four to excavate each square.
Once the grids had been laid out, we began the actual process of excavation. First, we removed all leaves and twigs from the squares in order to see the artifacts more clearly. Then, we started removing all artifacts from the squares and putting them into labeled bags reflecting their location and type. For example, we had a bag for bricks, one for glass, one for ceramics, and so-on. In order to excavate properly, archaeologists try to separate the artifacts they find into different levels based on how deep they are in the ground. Therefore, the artifacts on the surface and as deep as 10 cm below the surface were included in Level One, and we labeled them as such. During week five’s lab, students did not excavate deeper than Level One.

Another step in excavation involved looking for artifacts that might have been too small to distinguish from the dirt and slag. To find these, we collected the dirt in buckets and ran it through a ¼ inch screen. This removed the dirt while keeping any objects larger than soil on top of the screen, allowing us to add them to the right bags. By removing soil with trowels and dustpans, then adding it to a bucket and screening everything there, we were able to find many more artifacts than we originally would have.

The first grid we excavated, which we called Grid One, was located at the base of the depression in a space covered in bricks. Excavation of Grid One yielded only a handful of small glass shards and some other unidentifiable fragments. As four students excavated Grid One, six more excavated Grid Two and Grid Three. These two grids were located on the slope of the depression West of Grid One. Excavation of Grids Two and Three yielded a very high density of artifacts at Level One. A few examples of artifacts uncovered in Grids Two and Three include many broken glass bottles and jars, decorated ceramic sherds, two metal bracelets, a vintage flashlight battery, and a tube of lipstick which we hope to date.


Returning to the group that used the trimble to map points at our site, we had much more accurate readings this week than in the week before. After being trained by Sam, they proceeded to go around the boundaries of each survey grid to mark their points on the GPS. This is done by a process of triangulation, using the elevation and position of the points. After marking all of the points on the survey grid, the trimble team then did the same process for the excavation test unit grids. We now have accurate markings of all of the areas in the site that we have interacted with so far.
Overall, we made headway into surveying our site, which provided insights into which areas of the site were most likely to have been used by humans. We also began the process of excavating small test units, in which we found many interesting artifacts. At the same time, we began the process of mapping the site, which we will build on in later weeks. All in all, it was a successful lab period, and we are very much enjoying being outside in the Arb as the weather improves.
Week 4
Emmett Forster and Victoria Semmelhack
The primary foci of Week Four’s lab were to identify the boundaries of the Olin Farm Site, document any features or significant artifacts we came across, and to begin preparing the site for our future survey.
Once we got to the site, we gathered in the main sloped depression, which we later labeled Feature 1 (see Photo 1), and students were given small construction flags. To locate the site boundary, we used Feature 1 as a reference: students were instructed to explore the area around Feature 1 and look for surface artifacts, placing a pink flag near the artifact they found farthest from the feature. Any other features found during this process were noted with orange flags. This work will be important for our future research, as understanding where the edges of the site are will allow us to create survey and excavation units that will produce results. As a sort of pseudo-survey, the activity served another purpose: students got the opportunity to begin familiarizing themselves with the artifacts at the site, which helped them start thinking about curiosities, interests, and questions for their future research projects.

After about an hour of this work, students were called back to Feature 1 to discuss the findings. Synthesizing our findings, we created a rough outline of the site, features, and significant artifact collections, displayed in Figure 1. While the northern, eastern, and southern borders of the site generally lined up with our expectations, students continually found artifacts to the west of Feature 1, stretching After about an hour of this work, students were called back to Feature 1 to discuss the findings. Synthesizing our findings, we created a rough outline of the site, features, and significant artifact collections, displayed in Figure 1. While the northern, eastern, and southern borders of the site generally lined up with our expectations, students continually found artifacts to the west of Feature 1, stretching that edge of the site surprisingly far. We were likewise shocked by the wide range of surface artifacts. Students found what appeared to be bathroom tile and coiled chain link fence on the western edge of the site (see Artifact Collection 2 in Figure 1), numerous stone slabs to the near west of Feature 1 (see Artifact Collection 1 in Figure 1), and slag and animal bones throughout the entirety. Due to these findings, we realized that we will need to reimagine our aims for the project to focus on a much smaller area and scope; the remainder of our research will likely focus on Feature 1 itself or the area within several meters of the feature.

The class was then split into two groups, with one (Group One) making sketch maps, taking pictures, and filling out feature forms for features flagged earlier in the lab, and the other (Group Two) measuring and determining the grid. Group One divided further into two groups. The first group focused primarily on Feature 1 (see Figure 1 and Photo 1). After marking an orange flag on the slope with ‘F1’ (for Feature 1) we measured the feature vertically and horizontally: it was 3 meters high, the southwest side was 8.7 meters long, and the southeast side was 8 meters long. We faced, however, difficulty in making accurate measurements due to the density of tree trunks, roots, and other plants along the slope that interfered with the placement of our measuring tape. Another member of this group worked on filling out a Feature Form, which included a detailed sketch map (see Figure 2). Other people in this group also took photos of the slope (see Photo 1) to ensure thorough documentation and for future reference. The second half of Group Two measured and recorded Feature 2 (see Figures 1 and 3), which had a height of 0.85 meters, a length of 6.75 meters, and a width of 0.43 meters. As indicated in Figure 3, this half of Group One also made a sketch map.


We additionally helped Professor Sarah Kennedy determine the datum, the fixed point from which the rest of the site’s grid would be measured. A datum ideally is in a location that prevents against the possibility of any negative grid points (along the negative x-axis), however, ours was ultimately an easily visible rock near a large tree (Figure 1 and Photo 2); a location that will require some negative grid points.
Group Two used a measuring tape to determine the site’s grid points. Starting at the datum (Figure 1), the grid points were spaced five meters apart. Each point was marked with a stake and flagging tape, with the flagging tape ensuring the point’s visibility (see Photo 3). Group Two successfully measured points 100 meters north, and approximately 50 meters east and west of the datum.
With the help of TA Sam Wege, we used the Trimble (a form of GPS used for surveying) to identify points with which we could eventually create a map (Photo 4). Although there were some technical difficulties, as the Trimble initially was only accurate within five meters, these were later resolved and we were able to mark a starting modum at the site’s upper depression, and then record each of the site’s five fire pits as areas.
The range of artifacts found at the site during this lab raised questions about the site’s use and role within local history. Three of the aforementioned discoveries that especially complicated our understanding of the site were the bathroom tiles, the presence of slag (see Photo 5) throughout Feature 1 and in the depression, and the large, scattered animal bones. Our two foremost theories are that Carleton used this location as a storage area, or perhaps a dump site, although the exact details of the dump site are still unclear. In the upcoming labs, we are interested in identifying, or finding, artifacts that can help us establish approximate dates for the site. This will give us a clearer view of the site’s history, and an additional way of classifying artifacts. We would also like to determine whether there is any evidence of agriculture at the site, potentially combining historical archaeology with traditional fieldwork methods.


Week 3
Elaina Smith Boyle and Aidan Lee-Gilligan
Due to inclement weather, our survey, which was planned for Tuesday, April 12, 2022, was moved to April 14th. Though this forced us to shorten our overall survey and move our schedule around, the overall purpose remained the same. The only significant change was that we did not end up using a compass and counter to help in the survey.
The purpose of this study was to teach us, the students, how to conduct an archaeological survey and document the results and findings from said survey. We surveyed on the field just south of the Hill of Three Oaks, near the farmhouse. This land has previously been used for farming, and is a fairly popular spot for Carleton students to wander around. To the east of the field is a road, and the other three sides of the field are bordered by trees. The field itself is a large rectangle, around 300 meters wide (east to west) and 100 meters tall (north to south). The field was subdivided into 6 sections, each of which was 100 meters wide by 50 meters tall. The sections were labeled A1 through C2, where the northwest section was A1, the southwest section was A2, the middle north section was B1, and so on (Figure 1). Groups of students performed surface reconnaissance on each of these sections.

Figure 1. An overhead map of the field with each section labeled A1 through C2.
Our class was divided into groups A, B, and C. Each group letter corresponded to the sections that they were assigned to survey. Each group had 6 or 7 members in it; one student to walk ahead and record findings, and the remaining students each zig-zagging along their own corridor. We positioned the students in corridors going north to south, with an offset on the southern side. Students surveyed the top half of each letter section from east to west, then turned around and did the other half from west to east. Each student was assigned a 10 by 100 meter corridor to walk through and survey. Students were told to communicate with their group members if they found an artifact or feature of interest. Students in their group would then drop their backpacks to hold their place in their corridors, and then come over to look at the artifact. Each student had a bag to collect artifacts found in their corridor. Students did not collect all artifacts they came across, as many of them were split into multiple pieces with similar properties. However, we did count and make note of all the different artifacts encountered. After assessing the artifact, the students would all return to their corridors and continue surveying. Once all the students had completed surveying their corridor, we congregated to sort all the artifacts into different bags. Each bag was labeled with a specific type of material, and each artifact of that material was sorted into its respective bag. The student who was assigned to walk ahead and take notes wrote down the number of each artifact that was found in each corridor and sketched the location where it was found. We also noted all of the artifacts that didn’t fit in the listed categories, and included descriptions or sketches of those that we didn’t pick up. Once each group completed their first section (A1, B1, or C1), they lined up on the western side of the second section, in the same order from north to south, and began the surveying process again. Due to time constraints, C2 was not surveyed. After completing the full survey, students moved back into the classroom to finish labeling their findings. All bags were recorded, categorized, and stored somewhere safe. We brought an abundance of bags, marking flags, compasses, and counters. We also brought backpacks, cameras, tape measures, clipboards, and pencils.

Figure 2: Rough model showing how participants would walk in the field walk
Of the sections surveyed, by far the most artifacts were found in C1. We concluded that this is due to the ruins of a farmhouse we found there. Glass, stone, bricks and other materials from the feature were spread out over the area, likely spread around farming equipment over time. As we got further from the feature the amount of artifacts dropped, as can be seen in the sections other than C1. We concluded that the ruins were most likely a farm house due to an insulator, indicating that there was electricity, and its presence next to a farm field. Most of the artifacts in C1 were from the feature, with other artifacts generally being litter (beer cans, plastic, etc.). Some interesting artifacts include the porcelain insulator found, slag, and a cylindrical stone object. We at first could not figure out what the porcelain insulator was, thinking it might’ve been some sort of weight. Eventually we were able to use an inscription on it and its shape to figure it out.
Overall the lab had some issues due to inclement weather, but was nonetheless a good introduction to surveying. We learned more about the features found in the field as well as collected several interesting objects. Students learned the basics of field walking, artifact collecting and how to properly map out and document a feature. Though we did not get to cover all the ground we wished for, we were still able to learn a lot from this lab.


Week 2
Shoko Ishikawa and Nadine Musa
On Tuesday, April 5th, the class met in the Arb office. While we were initially planning to meet in Anderson for the lecture, we decided it would be best to do the arb walk earlier in the day because of the weather forecast. After making sure we were as waterproof as we could be, the class followed the knowledgeable Nancy Braker into the Arb.
The first stop we made was actually just right across the highway. It was a small white house that used to be the Old Farm House. There we learned about where the beloved Farm House got its name. Up until the 60s, Carleton had a full working farm, with cows and all. The house was called Farm House because it used to house actual farmers and student workers. Today a farmer still lives there with his family even though Carleton no longer has a farm. The farmer actually grew up there. Because he was tasked with picking rocks as a child, Nancy was convinced that he would have stumbled upon some indigenous artifacts. Much to her surprise, that was not the case. He had never seen any artifacts despite decades of meticulously combing the fields.
Next, Nancy brought us to a patch of land right beside the Old Farm House where the Arboretum staff recently cleared of honeysuckle and buckthorn, which are both invasive species. We found a piece of broken ceramic plates and some bits of animal bones scattered around. Sarah said that the bones are most likely pork or cow and that they might have been dumped there by a local butcher since the bones had a clean cut. We found one piece of bone that had what looked like scratch marks, and Sarah explained that the voles that live in the Arb probably nibbled at it for calcium intake. Since this area has been covered by vegetation, there have been no recent surveys or excavations done, which could mean that there may be some artifacts that have not been confirmed by Carleton, which is an exciting thought.
Following the Old Farm House, Nancy took us to the open prairie. While many thought the prairie was just a natural land formation, we soon learned that wasn’t the case. The prairie was actually created by the native nations that previously inhabited Northfield. Through systematic cutting and burn, they turned the prairie into what it is today, a breathtaking open field.
As we moved away from the prairie, we walked on a trail path that was believed to be created by the indigenous peoples of Northfield. This is unfortunately when the rain began to pick up. As we hurried along, Nancy spoke about the challenges Native Americans faced farming so close to Cannon River. While the crop could benefit from the nutrient-rich sediment the river brought in, when the river flooded, which was about 2 out of every 5 years, the Native Americans would lose their crop. But since the nutrients from sediments resulted in such a bountiful harvest, oftentimes the off years were not as bad.
We continued down the path and took a turn to walk on a man-made path to what was left of the suspension bridge that used to span the Cannon river. This was the area that the lab class from 2021 did research on. The bridge was destroyed in the 1940s due to flooding, and there were rusty metal structures left on the bank and in the river. It was interesting to see how these kinds of trash and waste generated from human activities were left in the Arb and not taken care of appropriately.
For our last stop, we came to the site of a class last year and excavation. In the middle of it was a pile of old Hamm’s cans. The rusted bottles dated themselves because of their vintage designs. While it would be hard to believe that all the cans could be attributed to Carleton’s penchant for having a good time, Nancy told us that some of these cans were used for target practice. Some of the cans had holes in them and the lab class that excavated there also found some bullet shells. The excavation site had a rock formation, which Sarah and Nancy think are indicators that the site used to be a quarry, which was a perfect ledge for the cans during target practice. Before we left, the TA who worked on the site last year revealed that the pile of cans was courtesy of their dig. While some archaeologists try their best to naturalize their excavation site, his group just groups all the cans of beer they found in a pile.
This lab session helped to put ourselves in the context of Northfield and the Cowling Arboretum while also giving us an opportunity to think like an archaeologist. There were multiple features and artifacts that were scattered throughout the Arb, and each indicated the history and nature of the land and human culture.

Gallery: Photos of the Locations the Class Visited During the Arb Walk

“Animal bone found behind the Old Farm House with bite marks”

“Prairie”

“Remains of the suspension bridge”

“Previous Class Excavation Site”
Week 1
Brian Best and Sigrid Edstrom
On Tuesday, March 29th, the class reviewed course logistics and answered last minute questions about the syllabus for the term. Once these questions were resolved, we shared hypothetical case study questions that we created as part of our Questions First assignment prior to the lab. The goal behind this was to highlight how archaeologists can investigate numerous concepts related to societies that existed in the past, provided that the scope of research is narrowed enough. Students showed interest in a variety of topics, from colonial legacies in Sicily to migration patterns in Hawaii.
The next part of the lab focused on not just being able to make archaeological questions, but also how to go about answering them. New groups were formed to develop potential final project ideas based on specific processes used in archaeology that interested us (such as initial surveying or mapping). Once these ideas were formulated, groups made connections to the process that interested them and how best to apply that method to the idea.
We then moved discussion toward reviewing the significance of the Cowling Arboretum (knowing simply as the Arb), both as a place of forgetting. The class watched a student-led presentation (see link provided) outlining the history of the Arb and how Carleton came into possession of the land at the cost of Dakota Indians in the area. Understanding these details, students can begin to reevaluate the settler-centric approach to seeing the Arb. It was made clear that the Arb as a place did not start with the founders of Northfield, but rather the indigenous peoples who had inhabited the land since time immemorial. This nuance is what allows for further exploration in the main question of the lab: how does the Arb (either intentionally or unintentionally) present itself as a place where we can forget or ignore its Dakota roots?
To investigate the above question, we moved class to the Upper Arb to discover the role of monuments in creating this sense of forgetting. After a brief demonstration of a technique called stone rubbing (sometimes referred to as grave rubbing), we split off into groups and used this new skill to rub key words and phrases on paper that helped to reinforce the role of the Arb as a place in which Dakota history can be forgotten (see Gallery below for student examples). Reconvening toward the end of the lab, we expressed our surprise with how many monuments there were in this part of the Arb, as well as how hidden away they are from the commonly used pathways. Some monuments were dedicated to student athletes, generally painting them in a positive light, while others were dedicated to the more general history of Northfield. Briefly, we discussed the idea of how an archaeologist in the future would look upon these monuments and attempt to piece together what kind of school Carleton was like. We concluded that an outsider would most likely conclude that Carleton and the surrounding Northfield area was quite fond of religion, and that Carleton was a school that highly valued athletic achievement. With all this said, we realized that at no point were monuments dedicated to the Dakota people, instead focusing on the history of Northfield from a settler perspective. In trying to commemorate these events or people in Minnesota history, it became clear that it was equally important to recognize the history of indigenous communities as part of broader American studies.

Location in Upper Arb where monuments were subject to grave rubbing
Gallery: Examples of grave rubbings collected by students


